Continuous Delivery for Android using Fastlane and GitHub Actions
Prerequisites
Before continuing with the tutorial…
- Make sure you use GitHub
- Your app is already deployed on Google Play store
- Desire to read 😆…
Important about the price
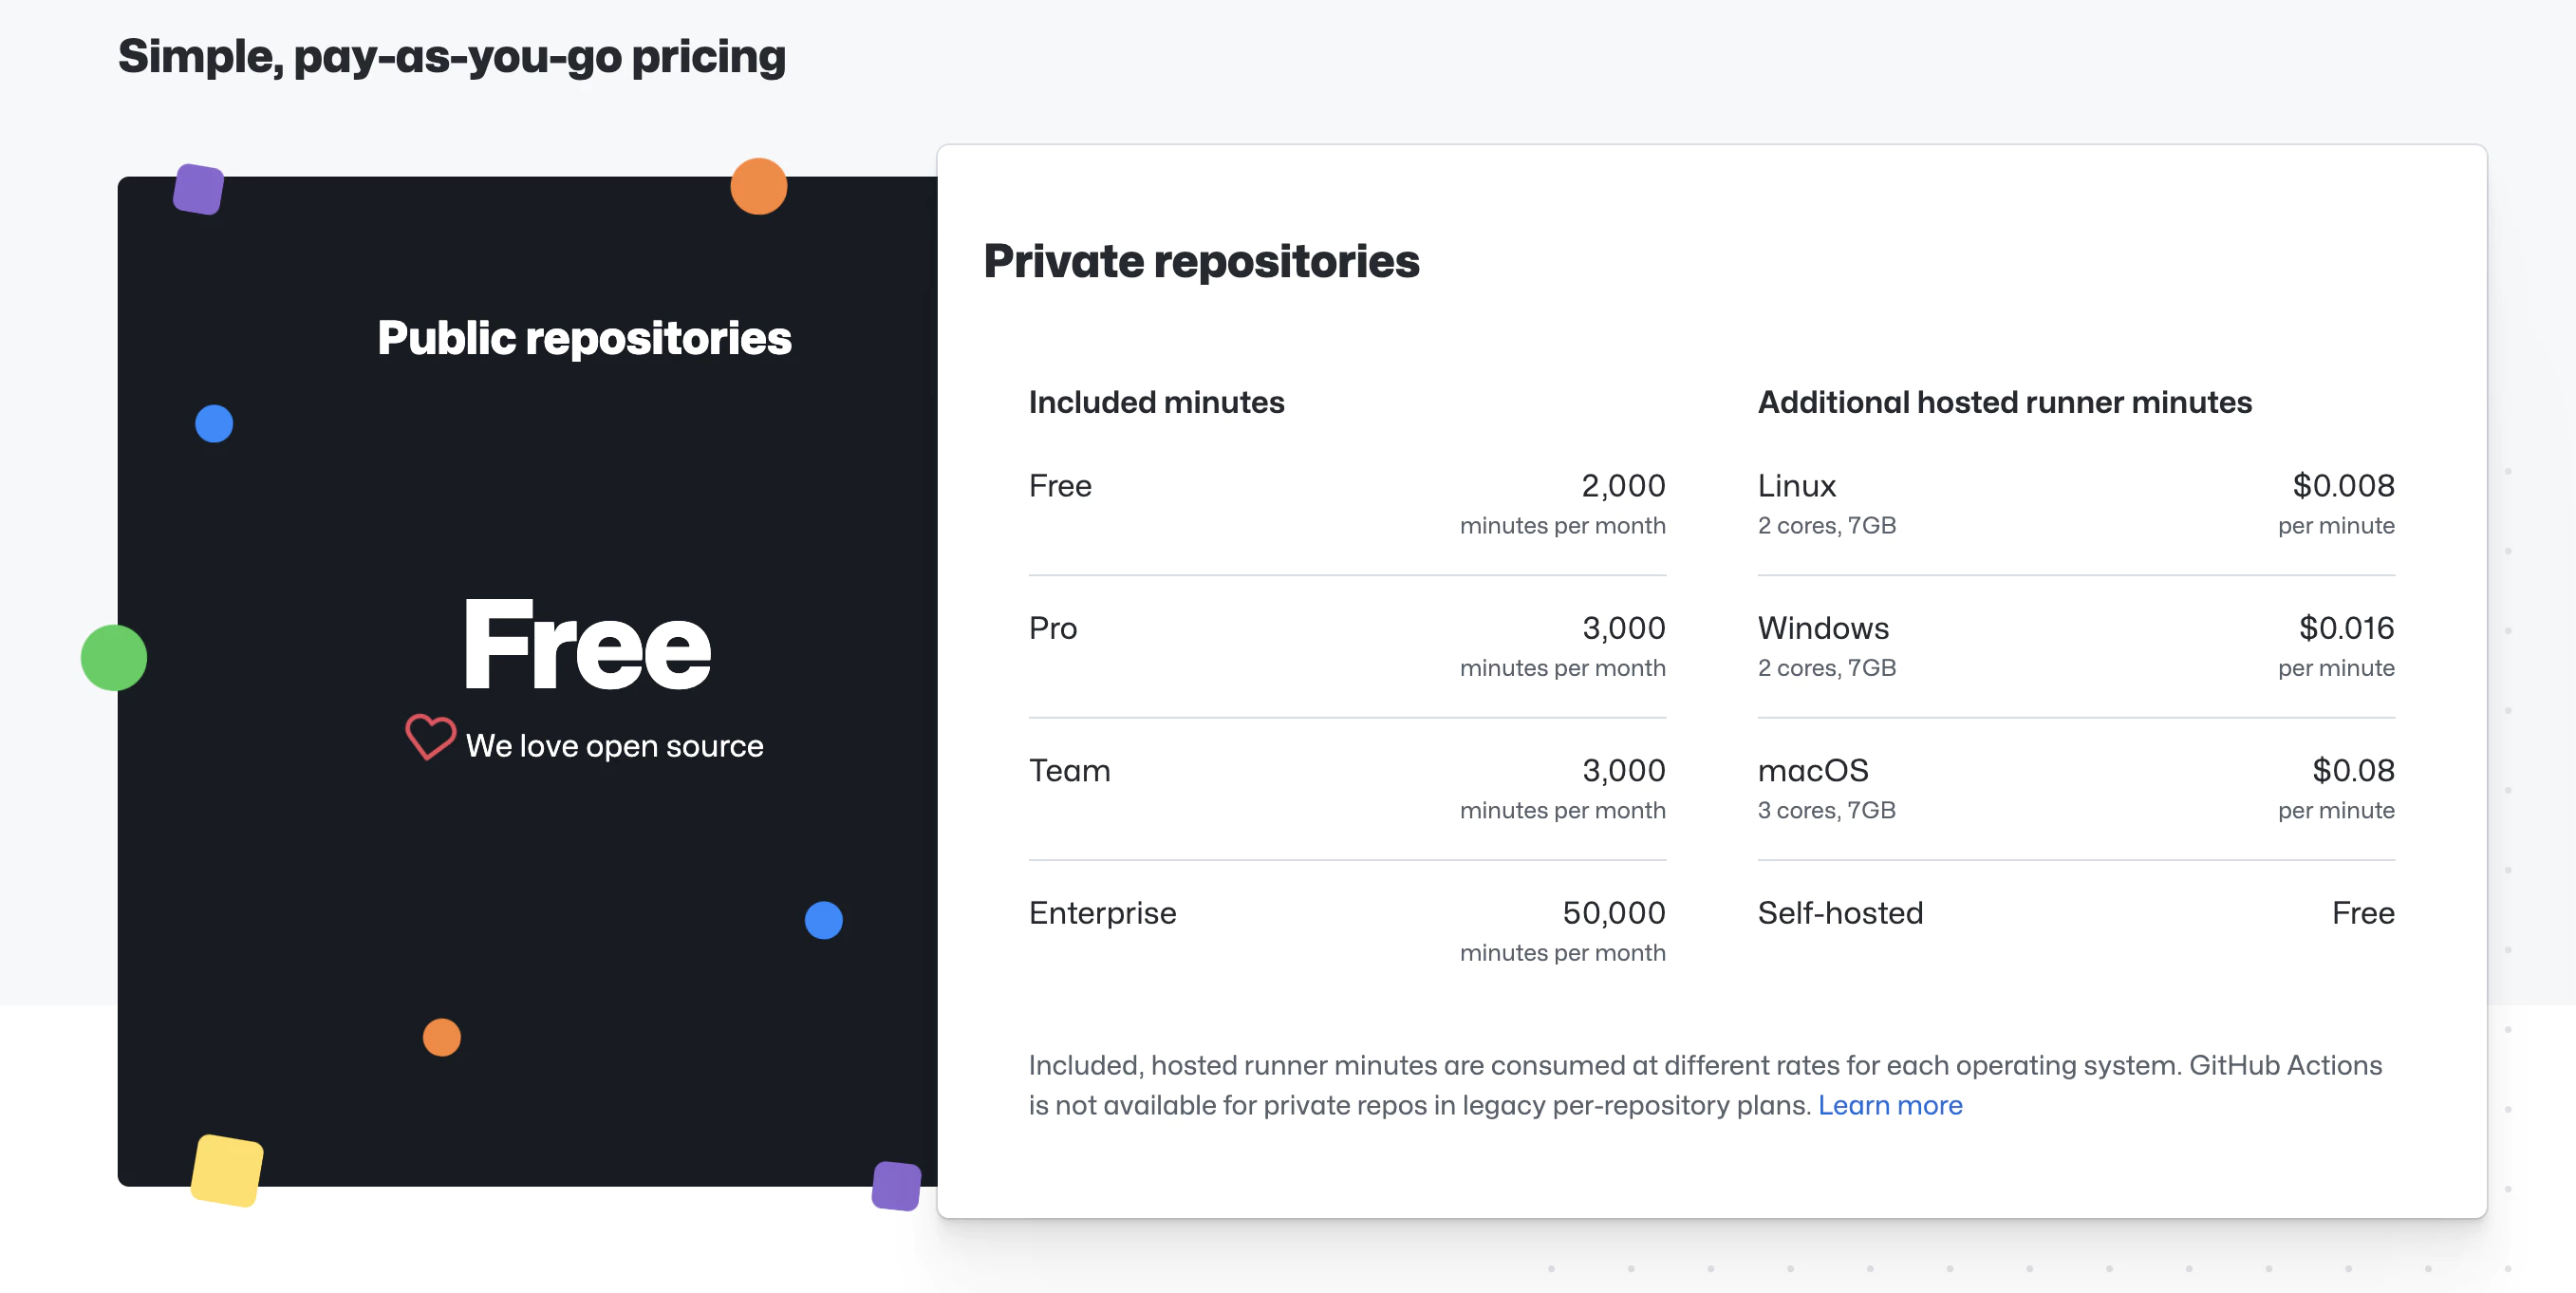
https://github.com/features/actions
The service is ‘free’ up to the limit, depending on the chosen machine.
We are going to use a Linux machine, you can see in the screenshot its price and limits (prices as of the creation of the tutorial, they could undergo changes in the future)
🔴 Once warned of requirements and prices, if you want, we continue…
📣 In the post we assume that we have the app created in Google Play, we do have the signing key of the Google ecosystem
Let’s go to the mess 🧑🏽💻
Steps to follow in the post
- Copy Fastline files
- Storing your secrets in GitHub encrypted secrets
- Creating & storing your Google Play service account key
- Storing your Android signing key
- Set up your GitHub Actions workflow .yml file
1. Copy Fastline files
Fastlane is a Ruby library created to automate common mobile development tasks. Using Fastlane, you can configure custom “lanes” which bundle a series of “actions” that perform tasks that you’d normally perform using Android studio. You can do a lot with Fastlane, but for the purposes of this tutorial, we’ll be using only a handful of core actions.
Create a Fastlane folder at the root of your project and copy the following files: Fastlane
default_platform(:android)
KEYSTORE_PATH = ENV["KEYSTORE_PATH"]KEYSTORE_KEY_ALIAS = ENV["KEYSTORE_KEY_ALIAS"]KEYSTORE_KEY_PASSWORD = ENV["KEYSTORE_KEY_PASSWORD"]KEYSTORE_STORE_PASSWORD = ENV["KEYSTORE_STORE_PASSWORD"]ANDROID_JSON_KEY_FILE = ENV['ANDROID_JSON_KEY_FILE']
platform :android do    desc "Deploy a beta version to the Google Play"    lane :beta do        gradle(          task: "clean bundleRelease",          project_dir: 'android/',          print_command: false,          properties: {            "android.injected.signing.store.file" => "#{KEYSTORE_PATH}",            "android.injected.signing.store.password" => "#{KEYSTORE_STORE_PASSWORD}",            "android.injected.signing.key.alias" => "#{KEYSTORE_KEY_ALIAS}",            "android.injected.signing.key.password" => "#{KEYSTORE_KEY_PASSWORD}",          })        upload_to_play_store(          json_key: ANDROID_JSON_KEY_FILE,          track: 'beta',          skip_upload_metadata: true,          skip_upload_changelogs: true,          skip_upload_images: true,          skip_upload_screenshots: true,        )    end    lane :build do      gradle(        task: "clean bundleRelease",        project_dir: 'android/',        print_command: false,        properties: {          "android.injected.signing.store.file" => "#{KEYSTORE_PATH}",          "android.injected.signing.store.password" => "#{KEYSTORE_STORE_PASSWORD}",          "android.injected.signing.key.alias" => "#{KEYSTORE_KEY_ALIAS}",          "android.injected.signing.key.password" => "#{KEYSTORE_KEY_PASSWORD}",        })    end    lane :prod_release do      build_gradle = File.read("../android/app/build.gradle")
      verify_changelog_exists(version_code: build_gradle.match(/versionCode (\d+)/)[1])      verify_upload_to_staging(version_name: build_gradle.match(/versionName '([\d\.]+)'/)[1])
      supply(        track_promote_to: 'beta',        skip_upload_apk: true,        skip_upload_aab: true,        skip_upload_metadata: false,        skip_upload_changelogs: false,        skip_upload_images: false,        skip_upload_screenshots: false      )    endend
Appfile
json_key_file(ENV["ANDROID_JSON_KEY_FILE"])package_name(ENV['DEVELOPER_PACKAGE_NAME'])Storing your secrets in GitHub encrypted secrets
To authenticate with the Google Play Developer API, we’ll need a service account key. The service account key file is considered sensitive, which means we’ll need to store it securely, but in a place where it can be accessed by our GitHub Actions workflows and our Fastfile when needed. Enter GitHub’s encrypted secrets: we’ll be storing all our sensitive keys in repository secrets, holding them securely while also making them automatically accessible to the GitHub Actions workflows in the repository.
Creating & storing your Google Play service account key
If you need to create a new service account key, follow the steps outlined here. One you have your service account key JSON file, let’s add it to your GitHub repository’s encrypted secrets.
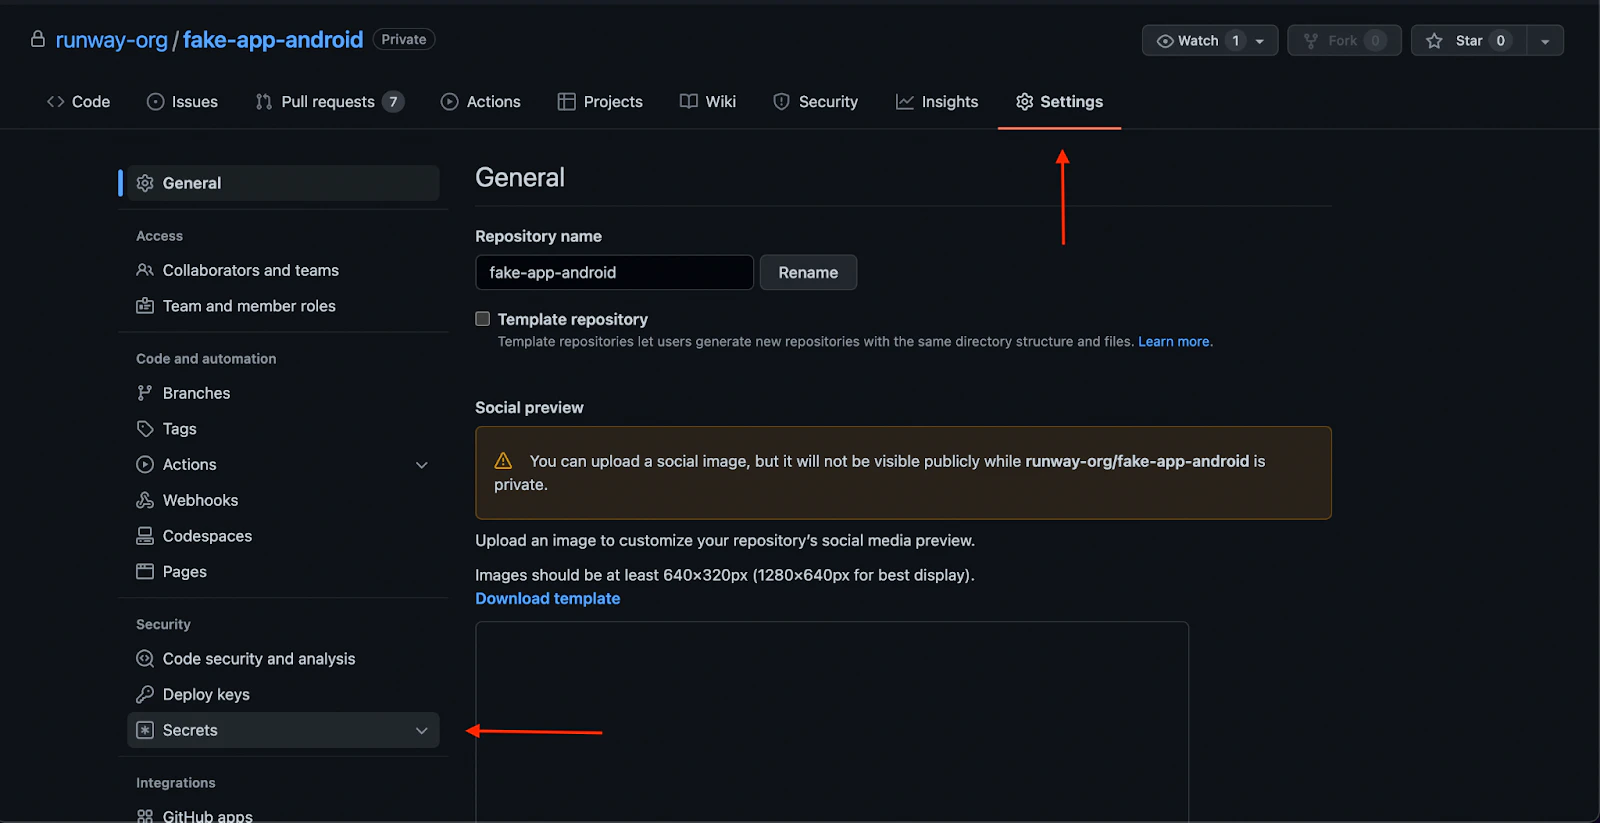
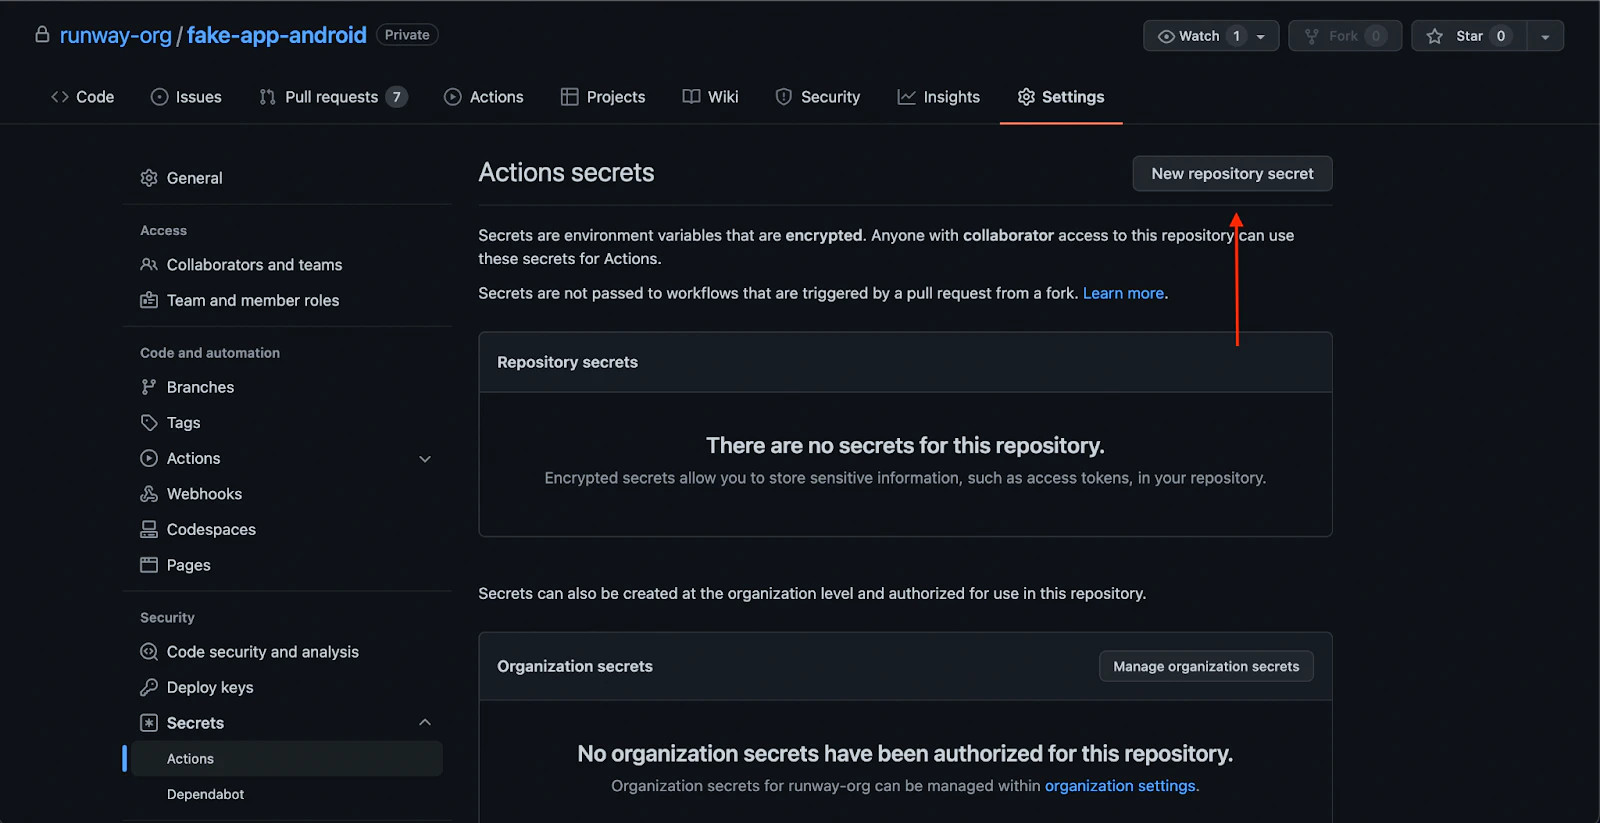
To add a new secret to GitHub’s encrypted secrets, first navigate to the Android repo to which you’ll be adding the GitHub Actions workflow. On the far right, click “Settings”.

Then, click “Secrets”,
then “Actions” from the list in the left menu.
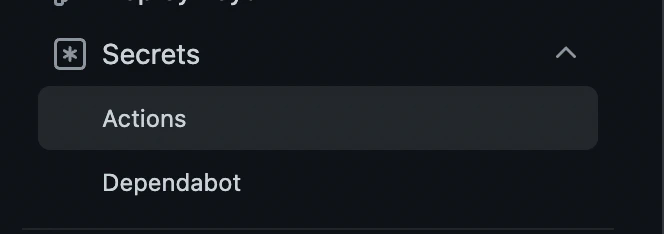
These are the encrypted secret environment variables for the repository. Any workflows set up on the repository will have access to these repository secrets.
From here, click “New repository secret” to add a new secret:
When you click “New repository secret”, you’ll see a form that will prompt you to enter a name for your new secret, and its value.
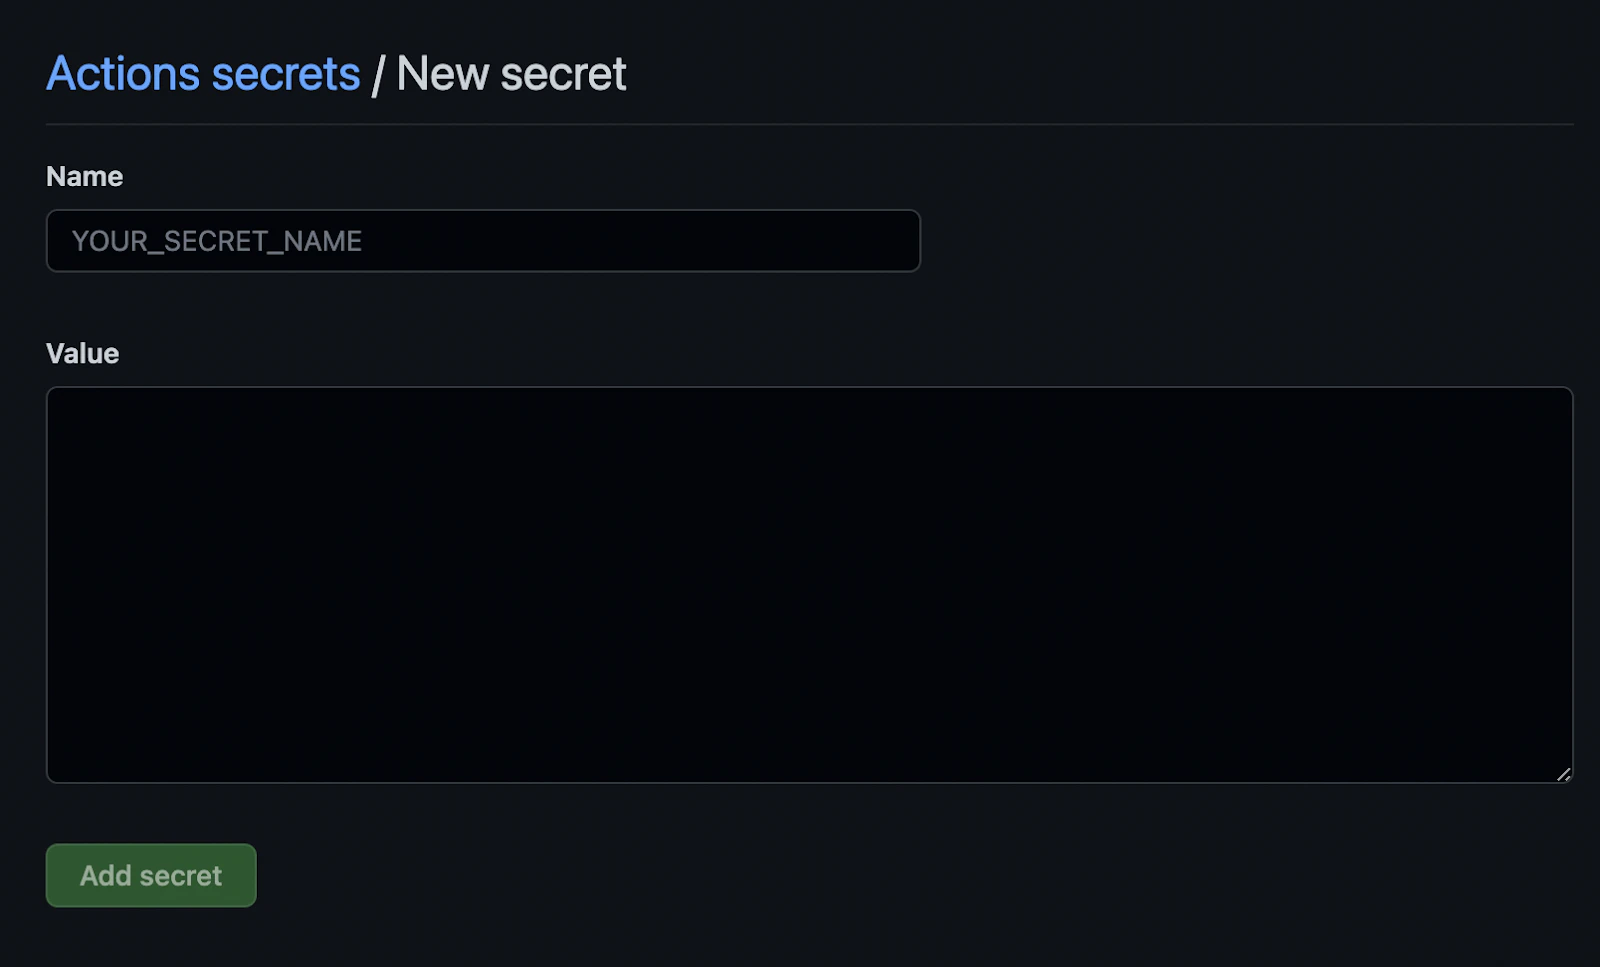
GitHub secrets only accept string values, so for certain credentials (any .jks or .json files for example), you’ll first need to convert the file to a base64-encoded string before adding it to GitHub secrets. You can do this from the command line:
base64 in_file_path | pbcopyThis copies the resulting string to your clipboard, so you can paste it directly into a new repository secret on GitHub.
For example:
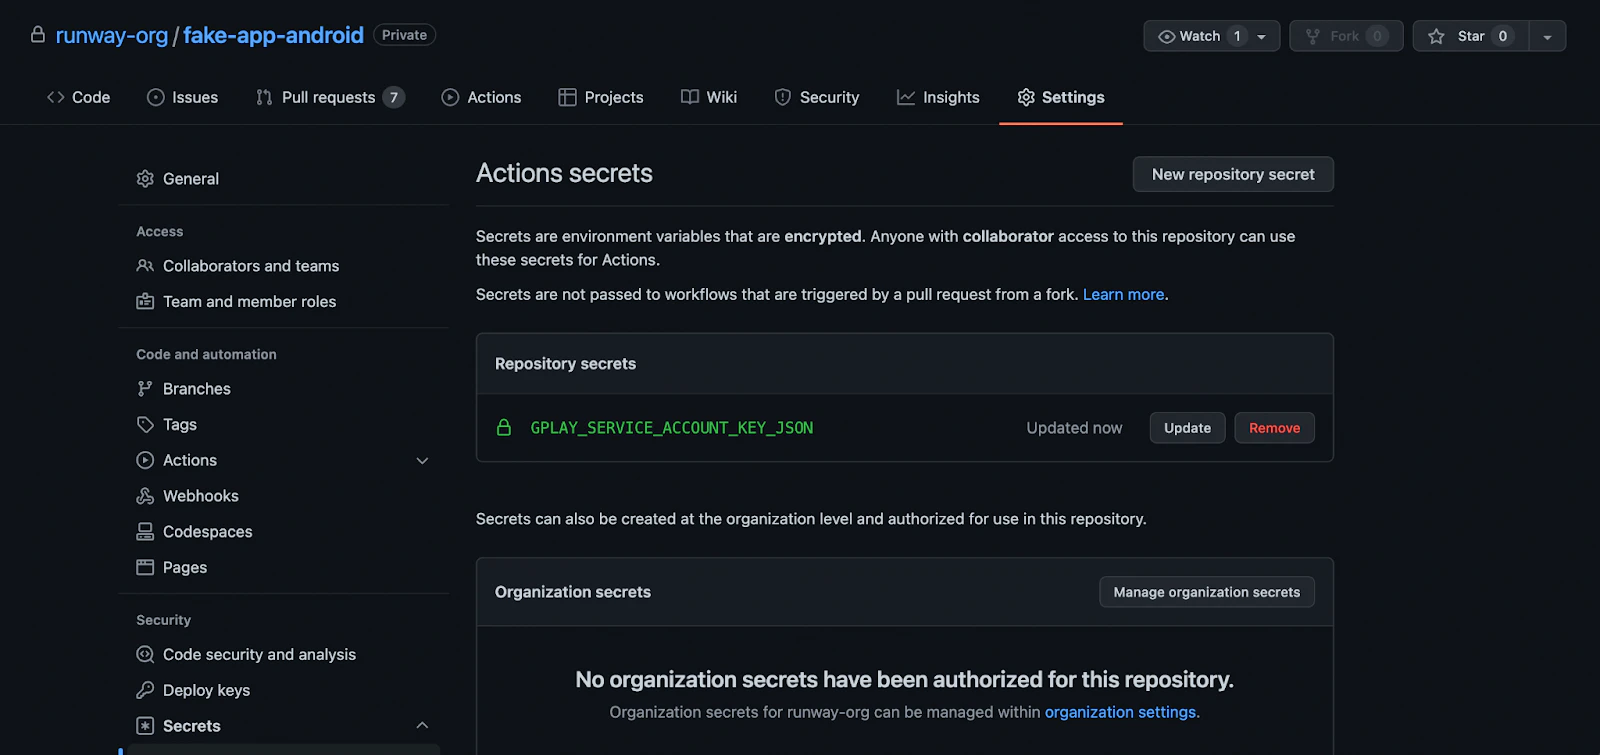
base64 service_account_key.json | pbcopyLet’s create a new repository secret as follows:
- PLAY_CONFIG_JSON: the base64-encoded service account key JSON
Kindly note that you should store a backup copy of your secrets securely in another location (somewhere that is not GitHub encrypted secrets), as you won’t be able to export or access the credentials again from GitHub after you’ve added them.
With our service account key added to GitHub’s repository secrets, we can now authenticate with the Google Play Developer API from within any GitHub Actions workflows added to the repository.
Storing your Android signing key
To properly sign Android release builds in CI, the workflow will need access to either an Android upload key or an app signing key. Apps created after August 2021 will use Google’s new Play App Signing system by default, in which a user-managed upload key is used to sign AABs before upload, but the app signing key is managed by Google. If your team is making use of Google’s Play App Signing, then all you’ll need for the CI pipeline is your app’s upload key, since signing is deferred until after the AAB has been uploaded to the Play Console. If you still need to create an upload key and keystore, follow the instructions found in the Android developer documentation.
If your team hasn’t yet migrated to Google’s Play App Signing system, then you’ll instead need to make your app signing key available to the CI workflow to properly sign your app before upload.
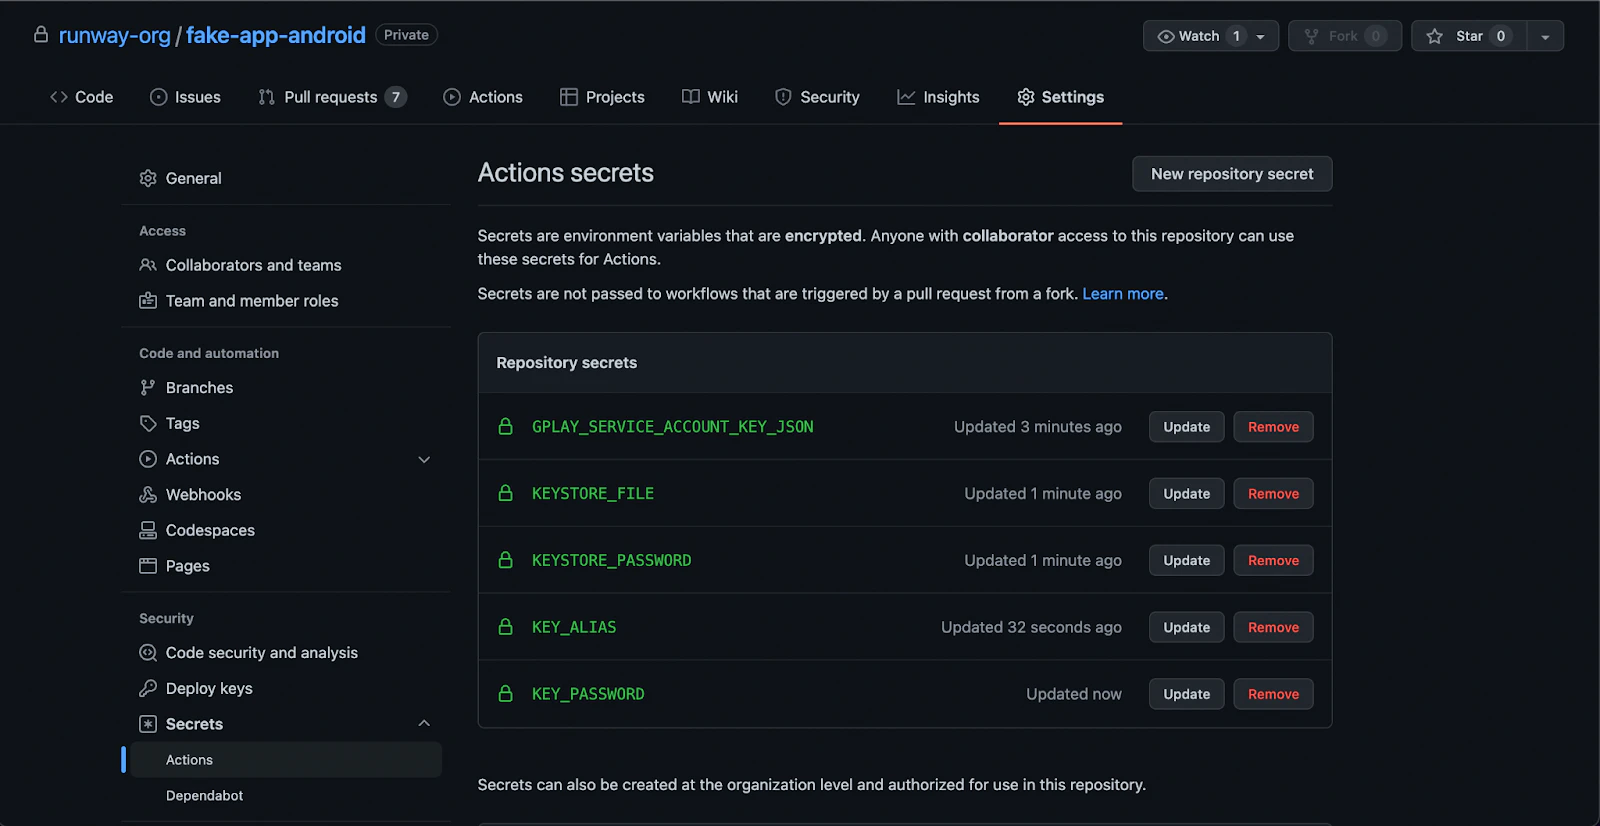
Add the following as repository secrets:
- ANDROID_KEYSTORE_FILE: the base64-encoded
.jksor.keystorefile used to sign your Android builds. This will either be the keystore file associated with your upload key (if using Play App Signing), or your app signing key. - KEYSTORE_KEY_PASSWORD: the password associated with the keystore file
- KEYSTORE_KEY_ALIAS: the key store alias
- KEYSTORE_STORE_PASSWORD: the private key password
- DEVELOPER_PACKAGE_NAME: your android app ID like com.example.app With these secrets added to GitHub’s repository secrets, we’re ready to set up our GitHub Actions workflow to run our builds.
Set up your GitHub Actions workflow .yml file
Now, let’s set up our Android GitHub Actions workflow .yml file – it’ll define the steps we’ll run as part of our workflow. Within these steps, we’ll call our Fastlane lanes.
First, let’s create the necessary folders. From your project’s root directory, call:
mkdir .github && cd .github && mkdir workflows && cd workflows && touch build-upload-android.ymlThen, paste the following code into your newly created build-upload-android.yml file:
name: Build source code on android
on:  push:    tags:      - '*'
jobs:  build_android:    runs-on: ubuntu-latest    steps:      - uses: actions/checkout@v4      - name: Use Node.js 16        uses: actions/setup-node@v3        with:          node-version: 16          cache: npm      - name: Install dependencies        id: install_code        run: npm ci      - uses: actions/cache@v3        with:          path: |            ~/.gradle/caches            ~/.gradle/wrapper          key: ${{ runner.os }}-gradle-${{ hashFiles('**/*.gradle*', '**/gradle-wrapper.properties') }}          restore-keys: |            ${{ runner.os }}-gradle-      - name: Build        id: build_code        run: npm run build      - name: Sync        id: sync_code        run: npx cap sync      - name: Setup java        uses: actions/setup-java@v3        with:          distribution: zulu          java-version: '11'      - name: Decode Keystore File        uses: timheuer/base64-to-file@v1        id: android_keystore        with:          fileName: android_keystore.keystore          encodedString: ${{ secrets.ANDROID_KEYSTORE_FILE }}      - name: Decode Google Play Confi File        uses: timheuer/base64-to-file@v1        id: service_account_json_file        with:          fileName: serviceAccount.json          encodedString: ${{ secrets.PLAY_CONFIG_JSON }}      - uses: maierj/fastlane-action@v2.3.0        env:          KEYSTORE_PATH: ${{ steps.android_keystore.outputs.filePath }}          ANDROID_JSON_KEY_FILE: ${{ steps.service_account_json_file.outputs.filePath }}          DEVELOPER_PACKAGE_NAME: ${{ secrets.DEVELOPER_PACKAGE_NAME }}          KEYSTORE_KEY_ALIAS: ${{ secrets.KEYSTORE_KEY_ALIAS }}          KEYSTORE_KEY_PASSWORD: ${{ secrets.KEYSTORE_KEY_PASSWORD }}          KEYSTORE_STORE_PASSWORD: ${{ secrets.KEYSTORE_STORE_PASSWORD }}        with:          lane: android beta      - name: Upload release bundle        uses: actions/upload-artifact@v2        with:          name: android-release          path: ./android/app/build/outputs/bundle/release/app-release.aab          retention-days: 60
This workflow should be triggered after each GitHub tag, if you need to automatize tag please, refer to Automatic build and release with GitHub actions
Then this workflow will pull your Node.js deps, install them and build your JavaScript app.
Your App doesn’t need to use Ionic, only Capacitor base is mandatory., it can have old Cordova module, but Capacitor JS plugin should be preferred.
Each time you send a new commit, a release will be built in Google Play console, beta channel.
I will improve this blog with your feedbacks, if you have any questions or suggestions, please let me know by email martin@capgo.app
Build Processing
In GitHub Actions, you are billed based on the minutes you have used for running your CI/CD workflow. From experience, it takes about 3–5 minutes before a build can be processed in Google Play Store.
For private projects, the estimated cost per build can go up to $0.008/min x 5 mins = $0.4, or more, depending on the configuration or dependencies of your project.
For Open-source projects, this shouldn’t be a problem at all. See pricing.
Thanks
This blog is based on the following articles:
- Automate publishing app to the Google Play Store with GitHub Actions⚡+ Fastlane🏃
- Getting Started CI/CD for Android Project (Part - 3— GitHub Actions)
- Android Continuous Integration using Fastlane and CircleCI 2.0 — Part III
- How to set up a CI/CD pipeline for your Android app using Fastlane and GitHub Actions
- Fastlane Documentation
- This GitHub message from @mrogunlana

